Thursday, February 28, 2013

Tutorial WPAP using CorelDRAW

Ok .. now look at how to make it ... Suppose that we will make a photo Iwan FALS model are as below;


Before you begin, first activate the Snap to Object, located in the Menu Bar> View> Snap to Object, then tracing by using the Freehand tool in the toolbox, we can tracing freely, so the faster we do not need to create objects that are important closed between the intersections (intersect) tangent line (the active Snap to object we will be more convenient) to note WPAP no object in the shape of curved lines, as shown below results;


When you have finished tracing, waste picture Iwan Fals, then we can do the coloring process, because we had faceting process with an open object then can not immediately fill color from the Color Pallete but must use the Smart Fill tool in the toolbox, the colors used are colors pop;


results after all the objects we give the color, the charging process color using Smart Fill tool created a new object;


The next step is to hide the black outline that are not used, the easiest way is select all the objects and right click a cross (X) in the Color Palette, the result will be as below;


Tuesday, February 26, 2013

Make a Magnifying Glass Effect CorelDRAW


Make a magnifying glass effect in CorelDRAW there are actually bermacam2 way, but here we will make it the right way that is in accordance with the features provided to make the enlargement of an object in a specific section, we will discuss is to make the effect as the picture;


how to make it as follows;

we first create an object, it's up to you, what object would be enlarged, here I am making stellar objects, as shown below;


Create a circle object using the Rectangle tool in the Toolbox, place it anywhere


Next, circular object in the selected state / active Menu Bar -> Effects -> select Lens


Docker so it appears that it's on the right side of your monitor display, and select the drop down Magnify


Amount type = 1.2, then click Apply


The results are as shown below, because it will be given additional images then you must give a check in the Frozen aiming to create a new object then click Apply;


In addition in order to give a realistic picture we looked lop picture above (look on the internet, try to find a free image be safe) for that rim width equal to the object lop circle;


Give a Drop Shadow shadow effects tool in the Toolbox;


The end result, as pictured below, good luck.


Monday, February 25, 2013

Three First Steps in the design of Corel Draw

Science Graphic Design Three First Steps in Process Design or make some design work using graphic design software photoshop, illustrator / coreldraw. So whatever software you use to create graphic design tips still apply. So what are some tips and how effective this?


1. Knowing the type of design that would be Created

The point is being able to imagine how the settings the object to a design in accordance with the provisions applicable to the design, such as design Cover magazine. Before we designed it, we should be able to visualize the design of a magazine cover, or even NOT POSTER OR BANNER!!!!.


2. Knowing Objects that should be used

After knowing this first step, we also need to know the object that is generally contained in a design project. Magazine Cover For instance, the object of which is usually contained in a cover are:

• Title / Name Magazine
• Illustration / Main Image
• Illustration - illustration extra to decorate
• The title of the article wants to find
• Issue Date
• Price Magazine
• Space for advertising / sponsor (optional)
• Another object requested by the CLIENT.

IMPORTANT
There are only four kinds of main objects in the design category, ie Image, Text, Color and Size. Each category was later split into several parts with different functions. For example, like the example above, ... Title / name of magazine, article title, publication date and the price included in the category of text. While the main illustration, decorate it included in the category of Fig.

3. Determining impression and Display Style Design

After the above two steps are met, then we have to determine the style that is used in our design. For example FUNKY, OFFICIAL, ELEGANT, POP. While the impression that should result from the design example FUN, SPORTY, EAGER, MELLOW, etc.. These two things can be determined from the description given by our clients.

IMPORTANT:
Impression and stylish design view usually arise from color - the color used, typeface / font, use of typography, style arrangement of the objects we use. Most of the impressions that will emerge depends illustrations that we use.


Sunday, February 24, 2013

How to Remove White Background In Attraction Pictures


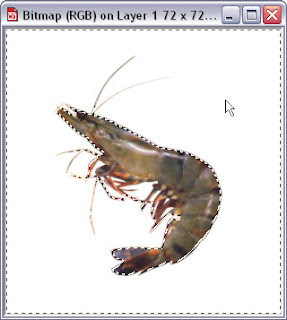
On the internet it is rare you find a picture without a background, when what you need is an image that does not have the background, for it to do tricks like this, for example, we have an object copy photos from the internet like this, the object is still a white background (or background any);


1. Before we remove the background, we first have to Convert to Bitmap first, because otherwise white background will not go away, click the object or selection, the menu bar> select sub menu Bitmaps> and click Convert to Bitmap ...


2. Then came the command box as below, check the Transparent background (this is important)


3. Then click Edit Bitmap ...


4. So the application Corel PHOTO-PAINT is open (not applicable on a portable CorelDRAW)


5. Find and click the Magic Wand Mask tool in the Toolbox that exist in Corel PHOTO-PAINT press "W" on the keyboard menu will be active;


6. Then click on a white background, as shown below;


7. Then press the Delete key on the keyboard;


8.  Thus the white background will be erased, such as the following results;


9. The next step click the Save icon and close the application Corel PHOTO-PAINT (or do not close, moving first into CorelDRAW make sure that the background is completely erased, if it is convinced closed Corel PHOTO-PAINT),


10. And we return to CorelDRAW, then you can give any background as shown below;


11. You can also align with the command object color named color Balance whice located on the Menu Bar > Effects > Adjust > Color Balance ... adjust the slider on the Color channel near the blue color;


12. The final result will be like below;


Done, good luck;


  • NB: remember images or designs without the background or deleted when the background bitmap must be stored in the form of Export to PNG format, check the mark on Transparent Background

Saturday, February 23, 2013

Creating Smoke Effect using Corel DRAW


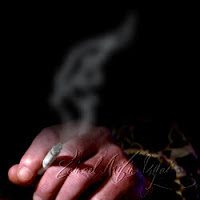
No need to worry if the object shots smoking on the outcome of our cameras produce images no smoke, tutorial about how to produce the effect of cigarette smoke on the hope the images we are going to look more alive.


Steps :
Prepare images photos from our camera, for example as shown below


 Create object with Ractangle tool box and black berries;


Next create a line object randomly with Freehand tool, click the pointer does not slide off at random, for example as shown below;


Furthermore, give effect to the Drop Shadow Drop Shadow tool in the Toolbox, and then delete the line object that we created earlier, but do not forget to press Ctrl + K on the keyboard first, so that the results of Shadow and object separate line;


The results are as shown below, and then give effect to the object transparent box at the bottom of the Transparency tool;


The end result as shown below;


Done, good luck.

Changing the Photo Effect Looks Like a Painting

Tags
Well, cool right? . hehe! but it's not like it's an image that will be built ... which we will discuss here only the emphasis on just the trick of how to create thunder and lightning effects are spectacular or devastating day you make your own, such as the example in the figure below we will give the effect of lightning .


Draw lines with irregular Freehand tool, click, hold, and drag

Adjust the thickness of the line to press F12 on the keyboard, replace the white color, press Ctrl + Shift + Q one by one, or grouped first according then Combine line thickness, then  Ctrl + Shift + Q click Weld on the Property Bar to bring together all the object 


Furthermore, the Menu Bar select Effects -> Countour ..., at Docker fairy sign on Outside the Steps: 1 and click Apply


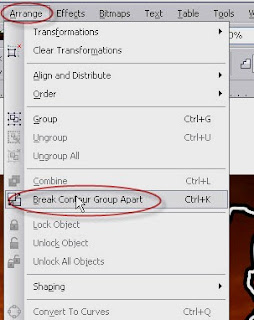
Then in the Menu Bar click Arrange -> Break Contour Group Apart (Ctrl + K)


So as to create a new object rather large, then give yellow Blur and give effect to the Menu Bar -> Bitmaps -> Blur -> Gaussian Blur ... (because it affects only a blur in CorelDRAW for the Bitmap object must Convert To Bitmap ... first!) 


So it becomes as shown below 

Furthermore, the selection of both object and Convert To Bitmap ... 


Give little effect Transparency


The results are as shown below, hehehe .... sizable
should not too terrible .....


Friday, February 22, 2013

Fire Effects Using the Mesh Fill Tool CorelDRAW

Actually, the trick is very simple, depending on your imagination in a drawing to produce a near-perfect effect fire.


This time we draw it using Feature Mesh Fill Tool (M) ~ M in brackets it means to press M on the keyboard are directed to the feature / menu ~

Steps were as follows;

Create a box with the Rectangle tool (F6)


Make a sketch of the fire by using the Freehand tool (F5) or Polyline tool


Object boxes are colored black, and white berries fire object and delete the outline of her (right click on the sidelines with a cross (X) in the Color Palette.


Select the Mesh Fill tool (M), the grid size type W = 30, H = 30, the more you type, the more the grid is created, and try to learn what menu in the Property Bar to feature a Mesh Fill tool, there is a Transparency ... etc ... etc. ..


Give red yellow black as the color of fire on node2 that existed at the intersection of Grid and natinya will be created from the combination of the color spectrum, and then slide the node according to your imagination.


To add a Grid, click on the vertical or horizontal line, click Add and then the intersection or press + on the Numpad, it will create a new grid. and do not forget the edge nodes background color match with the color.


The result will be as shown below, the results are close to perfect. finished ... good luck ..